欢迎大家赞助一杯啤酒🍺 我们准备了下酒菜:Formal mathematics/Isabelle/ML, Formal verification/Coq/ACL2/Agda, C++/Lisp/Haskell
CSS/tutorials/lesson13
来自开放百科 - 灰狐
(版本间的差异)
(→如何实现这个效果?) |
(→小结) |
||
| (未显示1个用户的2个中间版本) | |||
| 第30行: | 第30行: | ||
==另一个例子:列== | ==另一个例子:列== | ||
| + | 浮动也可以用于实现在文档中分列。要创建多个列,你需要在HTML代码里用div来结构化想要的各个列: | ||
| + | |||
| + | <nowiki> <div id="column1"> | ||
| + | <p>Haec disserens qua de re agatur | ||
| + | et in quo causa consistat non videt...</p> | ||
| + | </div> | ||
| + | |||
| + | <div id="column2"> | ||
| + | <p>causas naturales et antecedentes, | ||
| + | idciro etiam nostrarum voluntatum...</p> | ||
| + | </div> | ||
| + | |||
| + | <div id="column3"> | ||
| + | <p>nam nihil esset in nostra | ||
| + | potestate si res ita se haberet...</p> | ||
| + | </div></nowiki> | ||
| + | |||
| + | 下面,我们把各列的宽度设定为“33%”,并通过定义float属性令各列向左浮动 | ||
| + | |||
| + | <nowiki> #column1 { | ||
| + | float:left; | ||
| + | width: 33%; | ||
| + | } | ||
| + | |||
| + | #column2 { | ||
| + | float:left; | ||
| + | width: 33%; | ||
| + | } | ||
| + | |||
| + | #column3 { | ||
| + | float:left; | ||
| + | width: 33%; | ||
| + | }</nowiki> | ||
| + | |||
| + | [[Image:icon-example.gif]] [http://demo.huihoo.com/css/tutorials/lesson13-ex2.html 显示示例] | ||
| + | |||
| + | float属性的值可以是left、right或者none。 | ||
==clear属性== | ==clear属性== | ||
| + | CSS属性clear用于控制浮动元素的后继元素的行为。 | ||
| + | |||
| + | 缺省地,后继元素将向上移动,以填补由于前面元素的浮动而空出的可用空间。在前面的例子中,文本自动上移到了比尔盖茨的图片旁。 | ||
| + | |||
| + | clear属性的值可以是left、right、both或none。原则是这样的:如果一个盒子的clear属性被设为“both”,那么该盒子的上边距将始终处于前面的浮动盒子(如果存在的话)的下边距之下。 | ||
| + | |||
| + | <nowiki> <div id="picture"> | ||
| + | <img src="bill.jpg" alt="Bill Gates"> | ||
| + | </div> | ||
| + | |||
| + | <h1>Bill Gates</h1> | ||
| + | |||
| + | <p class="floatstop">causas naturales et antecedentes, | ||
| + | idciro etiam nostrarum voluntatum...</p></nowiki> | ||
| + | |||
| + | 要避免文本上移到图片旁,我们可以在CSS中添加以下代码: | ||
| + | |||
| + | <nowiki> #picture { | ||
| + | float:left; | ||
| + | width: 160px; | ||
| + | } | ||
| + | |||
| + | .floatstop { | ||
| + | clear:both; | ||
| + | }</nowiki> | ||
| + | |||
| + | [[Image:icon-example.gif]] [http://demo.huihoo.com/css/tutorials/lesson13-ex3.html 显示示例] | ||
==小结== | ==小结== | ||
| + | 浮动在很多情况下都很有用,它经常与定位联合使用。在[[CSS/tutorials/lesson14|下一课]],我们将深入了解如何进行盒子的绝对或相对定位 | ||
{{comment}} | {{comment}} | ||
[[Category:CSS]] | [[Category:CSS]] | ||
2010年10月17日 (日) 00:34的最后版本
目录 |
[编辑] 第13课:浮动元素(float)
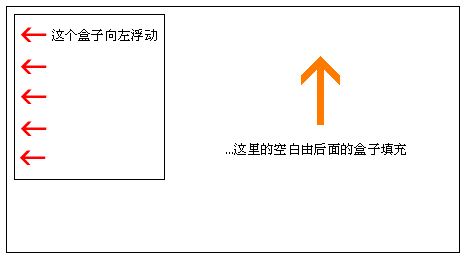
我们可以通过CSS属性float令元素向左或向右浮动。也就是说,令盒子及其中的内容浮动到文档(或者是上层盒子)的右边或者左边(参见第9课关于盒状模型的描述)。下图阐明了其原理:
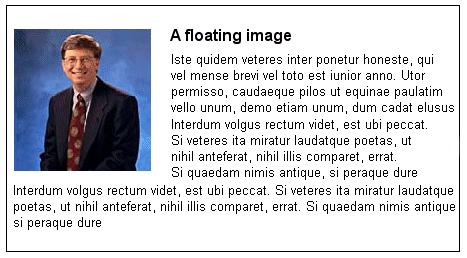
举个例子,假如我们想让一张图片被一段文字围绕着,那么其显示效果将如下所示:
[编辑] 如何实现这个效果?
上例的HTML代码如下所示:
 <div id="picture">
  <img src="bill.jpg" alt="Bill Gates">
  </div>

 <p>causas naturales et antecedentes,
  idciro etiam nostrarum voluntatum...</p>
要实现图片向左浮动、而且被文字环绕的效果,你只需先设定图片所在盒子的宽度,然后再把CSS属性float设为left即可:
#picture {
 float:left;
 width: 100px;
}
[编辑] 另一个例子:列
浮动也可以用于实现在文档中分列。要创建多个列,你需要在HTML代码里用div来结构化想要的各个列:
 <div id="column1">
  <p>Haec disserens qua de re agatur
  et in quo causa consistat non videt...</p>
 </div>

 <div id="column2">
  <p>causas naturales et antecedentes,
  idciro etiam nostrarum voluntatum...</p>
 </div>

 <div id="column3">
  <p>nam nihil esset in nostra
  potestate si res ita se haberet...</p>
 </div>
下面,我们把各列的宽度设定为“33%”,并通过定义float属性令各列向左浮动
 #column1 {
  float:left;
  width: 33%;
 }

 #column2 {
  float:left;
  width: 33%;
 }

 #column3 {
  float:left;
  width: 33%;
 }
float属性的值可以是left、right或者none。
[编辑] clear属性
CSS属性clear用于控制浮动元素的后继元素的行为。
缺省地,后继元素将向上移动,以填补由于前面元素的浮动而空出的可用空间。在前面的例子中,文本自动上移到了比尔盖茨的图片旁。
clear属性的值可以是left、right、both或none。原则是这样的:如果一个盒子的clear属性被设为“both”,那么该盒子的上边距将始终处于前面的浮动盒子(如果存在的话)的下边距之下。
 <div id="picture">
  <img src="bill.jpg" alt="Bill Gates">
 </div>

 <h1>Bill Gates</h1>

 <p class="floatstop">causas naturales et antecedentes,
 idciro etiam nostrarum voluntatum...</p>
要避免文本上移到图片旁,我们可以在CSS中添加以下代码:
 #picture {
  float:left;
  width: 160px;
 }

 .floatstop {
  clear:both;
 }
[编辑] 小结
浮动在很多情况下都很有用,它经常与定位联合使用。在下一课,我们将深入了解如何进行盒子的绝对或相对定位
<discussion>characters_max=300</discussion>
分享您的观点

